ArtsAutosBooksBusinessEducationEntertainmentFamilyFashionFoodGamesGenderHealthHolidaysHomeHubPagesPersonal FinancePetsPoliticsReligionSportsTechnologyTravel

Easy Home Made Zombie Ornaments

Updated on August 13, 2013

Zombie Decorations with Salt Dough

Salt dough takes a turn for the darkly delightful with these easy home made zombie ornaments. Simple to make with common kitchen staples, salt dough has long been a household go-to for Christmas crafts. This year, on a limited budget in a household that Really Digs Halloween, we've turned to salt dough for our Halloween décor, too!

Run, run, Mr. Gingerbread Man

I'm frugal by nature and not possessed of an intuitive understanding of the visual arts (okay, I'm a cheapskate with artistic abilities that end at stick figures and m-shaped birds). Salt dough rings all the right bells with me: cheap, easy to work with, and amenable to shaping by cookie-cutter or template.

If you pack your zombie ornaments away after Halloween (it sounds weird, I know, but I hear there are people who aren't into year-round zombie décor), wrap them in tissue paper and put them in an airtight container with some rice to absorb moisture. Salt dough doesn't take kindly to moisture. Before learning the rice trick, I opened more than one neatly sealed container of salt dough ornaments to find a limp, damp ornament apocalypse inside.

All photographs taken by the author.

First, Make Your Salt Dough

You Probably Already Have Everything You Need!

Basic salt dough is one of the easiest crafting materials you can make at home. It costs pennies, and is ready to work with immediately. For enough salt dough to make about 25 thin zombie ornaments or 15 thicker ornaments, you will need:

  • 1/2 cup salt
  • 1 cup flour
  • 1/2 cup room temperature water

Mix the salt and flour in a medium-sized bowl, then add the water. Stir until the mixture becomes lumpy and difficult to work with a spoon, and then get your hands in there and mix it with your fingers until you can easily form a ball of dough. If the mixture is too sticky to work with, add a little flour. Don't add more flour than you absolutely need, though, or the salt dough will be prone to cracking as it dries.

When you have a nice ball of dough, turn it out onto a lightly floured surface and knead the heck out of it for at least five minutes. Five minutes of kneading is hard to gauge subjectively, so it's a good idea to glance at a clock if you're making salt dough for the first time.

Keep kneading until the dough is very smooth and somewhat elastic. If you've made pasta dough, that's about what you want this to feel like. If your arms or hands get tired, which they probably will, just pick the dough up and squish and fold between your hands for a while.


Salt dough is ready when your fingers are too cramped for further kneading.

Once you have a nice, smooth ball of dough that you can fold and squish without breaking or tearing, you're done! Pause for a moment to admire your hands. Covered in cracked, peeling salt dough, they'll look more like zombie hands than you're likely to see again this side of the apocaylpse.

Wash your grody hands, and pull off about a quarter of the dough, a nice fist-sized lump, to work with, Stick the rest in the fridge in a tightly covered container.

Cut Out Your Zombie Ornaments

Missing Pieces are OK!

I suppose it's possible that one or two folks with otherwise well-stocked kitchens may not have a zombie cookie cutter. If that's you, you'll find both some to buy and some ideas for making do without one at the bottom of this page, under Stuff You'll Need.

Let your dough chill for 15 to 30 minutes in the fridge before you roll it out. Pull off a fist sized piece of dough to work with, and return the remaining dough to its covered container in the refrigerator.

For these hanging ornaments, I wanted the dough to curl and ripple slightly as it dried, so I rolled my dough quite thin, about 1/8-inch (3mm) on a lightly floured surface with a floured rolling pin (ok, with a floured vodka bottle). For thicker, flatter zombie decorations, roll your dough thicker and sandwich it between two sheets of wax paper rather than using extra flour. Be aware that thicker ornaments will take longer to dry.


Cut out your zombies... be sloppy!

Now it's time to cut out your zombie ornaments. The cool thing about cutting these is that you don't have to be neat about it. If you can get one more zombie in there by overlapping it with its neighbors, do so. They're zombies! They're supposed to have mangled and missing pieces! If you have some dough left over at the edges, go ahead and make some half-zombies. They'll be good crawlers.


Overlapping edges are fine

When you've got your zombies cut out, transfer them to a baking sheet that's been dusted with flour. Use something sharp (I used a barbecue skewer) to make a hole in each ornament for hanging. I went with holes in the center of the head, which can easily be painted as little bullet holes. You can also use this opportunity to shape the edges of any missing bits on your zombies into gruesome tatters.

Dry your zombie ornaments in a 150 to 200 degree oven for about two hours. It doesn't matter if they brown, as we'll be painting both sides. The higher the temperature, the more bubbling and curling you'll see in the dough. I used a 160 degree oven for 2 hours (ok, 3 hours on the batch I forgot about).


Drying zombie ornaments.

Put your oven-dried zombies on some cooling racks if you've got them, or cardboard if you don't, to cool. I like to let mine air dry for another day or two, as any remaining moisture in your zombie ornaments can make them turn into a mushy mess if you put them in a sealed container for storage later. I've painted plenty of thin salt dough creations right away and they've been fine. If your dough is 1/4 inch or thicker, do yourself a favor and let them air dry for at least 24 hours.

Paint Your Zombie Ornaments

And Maybe Throw Some Glitter on Them. Or Not. Your Call.

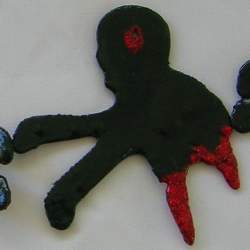
Your dried salt dough zombie ornaments are now ready to be painted! Simple, inexpensive acrylic paints do a great job on salt dough. I painted these zombie ornaments black with glittery red "blood" at the holes in their heads and the edges of any missing pieces. By all means, though, modify the colors and techniques you use to paint your zombies to suit your own tastes and the rest of your decor.


Gather your paints and brushes.

Before painting your zombie ornaments, lay down some cardboard or newspaper to protect against paint spills. Using a clean paintbrush, dust the ornament thoroughly to remove any flour or loose, dry salt dough.


Ready for painting!

For my black and red hanging zombie ornaments, I began with two coats of black paint, leaving bare areas around the holes in my zombies' heads and their "wounds."


The black base coat goes on first.

Once your zombies are nicely blackened, it's time to apply the "blood." After a little trial and error, I settled on multiple coats of DecoArt Sizzling Red Glamour Dust acrylic paint for the look I wanted. I'd originally pictured a darker, dried-blood look, but even with glitter darker colors weren't very visible against the black.

When wet or thinly applied, this red glitter paint looked alarmingly pink. With multiple layers, though, it turned a nice, fresh-blood red and pooled in a fabulously blood-like way at the edges of my zombies' wounds.

A few coats of paint for a gross wound.

Apply Sealer or Varnish

For Shine and Durability

This step is optional, but highly recommended. Salt dough is cheap and easy to work with, but durable it is not. A good coat of transparent sealer will help protect your zombie ornaments from moisture and scratches. If you don't want a glossy finish, just choose a matte sealer.


I used a glossy sealer.

For these hanging ornaments, I used Patricia Nimock's Clear Acrylic Sealer in a gloss finish. It's stinky and the label warns that it's at least as dangerous to your insides as zombies, so a well-ventilated spraying area is in order. I used two or three coats for each zombie ornament, until they were as smooth and glossy as I wanted them, allowing several hours between coats for the ornaments to dry.

Stuff You'll Need - It All Starts With a Cookie Cutter

I got my zombie cookie cutter on eBay, where it no longer appears to be available. There's a cool "Undead Fred" set on Amazon, though, with three zombie cookie cutters in appropriately awkward poses.

If you're only going to make a few ornaments, and you're not really keen on buying a zombie cookie cutter (even if it is totally awesome), you can always use a cookie template instead. Just draw a zombie or download and print some free zombie clip art, cut it out, and use your zombie cut-out as a template when cutting your ornaments.

Templates are definitely tiresome if you're making more than a couple of ornaments, but they do eliminate the need for a cookie cutter if you're pinching pennies or preparing these in too much of a hurry to order anything. Like, you know, if it's a zombie ornament emergency.

For decorating, any acrylic paints you already have should work just fine! I like the red Glamour Dust by DecoArt, as it gives a nice, sparkly finish without the need to apply glitter separately. If you're really into flinging glitter about, though, a layer of red acrylic paint sprinkled with glitter while still wet will produce pretty much the same effect.

DecoArt Glamour Dust 2-Ounce Sizzling Red Glitter Paint
A glittery paint in the color of your choice is a great way to decorate your zombies' "wounds."
 
DecoArt Crafter's Acrylic All-Purpose Paint 8oz, Black
I made my zombies black, but you might go with gray, or mix your own nasty rotten-flesh tone.
 
Loew Cornell 1018 Brush Set, AP 15-Piece Wood Handle
Any fairly small paint brushes suitable for use with acrylic paint will work fine.
 
Plaid Clear Acrylic Sealer Aerosol Spray, 6 Ounce (Pack of 1), Gloss
A sealer will help your ornaments last much longer.
 

Have you created an awesome zombie from salt dough or another medium? I want to hear about it! Share your zombie crafting story here, and help spread zombie awareness while there's still time.

working

This website uses cookies

As a user in the EEA, your approval is needed on a few things. To provide a better website experience, hubpages.com uses cookies (and other similar technologies) and may collect, process, and share personal data. Please choose which areas of our service you consent to our doing so.

For more information on managing or withdrawing consents and how we handle data, visit our Privacy Policy at: https://corp.maven.io/privacy-policy

Show Details
Necessary
HubPages Device IDThis is used to identify particular browsers or devices when the access the service, and is used for security reasons.
LoginThis is necessary to sign in to the HubPages Service.
Google RecaptchaThis is used to prevent bots and spam. (Privacy Policy)
AkismetThis is used to detect comment spam. (Privacy Policy)
HubPages Google AnalyticsThis is used to provide data on traffic to our website, all personally identifyable data is anonymized. (Privacy Policy)
HubPages Traffic PixelThis is used to collect data on traffic to articles and other pages on our site. Unless you are signed in to a HubPages account, all personally identifiable information is anonymized.
Amazon Web ServicesThis is a cloud services platform that we used to host our service. (Privacy Policy)
CloudflareThis is a cloud CDN service that we use to efficiently deliver files required for our service to operate such as javascript, cascading style sheets, images, and videos. (Privacy Policy)
Google Hosted LibrariesJavascript software libraries such as jQuery are loaded at endpoints on the googleapis.com or gstatic.com domains, for performance and efficiency reasons. (Privacy Policy)
Features
Google Custom SearchThis is feature allows you to search the site. (Privacy Policy)
Google MapsSome articles have Google Maps embedded in them. (Privacy Policy)
Google ChartsThis is used to display charts and graphs on articles and the author center. (Privacy Policy)
Google AdSense Host APIThis service allows you to sign up for or associate a Google AdSense account with HubPages, so that you can earn money from ads on your articles. No data is shared unless you engage with this feature. (Privacy Policy)
Google YouTubeSome articles have YouTube videos embedded in them. (Privacy Policy)
VimeoSome articles have Vimeo videos embedded in them. (Privacy Policy)
PaypalThis is used for a registered author who enrolls in the HubPages Earnings program and requests to be paid via PayPal. No data is shared with Paypal unless you engage with this feature. (Privacy Policy)
Facebook LoginYou can use this to streamline signing up for, or signing in to your Hubpages account. No data is shared with Facebook unless you engage with this feature. (Privacy Policy)
MavenThis supports the Maven widget and search functionality. (Privacy Policy)
Marketing
Google AdSenseThis is an ad network. (Privacy Policy)
Google DoubleClickGoogle provides ad serving technology and runs an ad network. (Privacy Policy)
Index ExchangeThis is an ad network. (Privacy Policy)
SovrnThis is an ad network. (Privacy Policy)
Facebook AdsThis is an ad network. (Privacy Policy)
Amazon Unified Ad MarketplaceThis is an ad network. (Privacy Policy)
AppNexusThis is an ad network. (Privacy Policy)
OpenxThis is an ad network. (Privacy Policy)
Rubicon ProjectThis is an ad network. (Privacy Policy)
TripleLiftThis is an ad network. (Privacy Policy)
Say MediaWe partner with Say Media to deliver ad campaigns on our sites. (Privacy Policy)
Remarketing PixelsWe may use remarketing pixels from advertising networks such as Google AdWords, Bing Ads, and Facebook in order to advertise the HubPages Service to people that have visited our sites.
Conversion Tracking PixelsWe may use conversion tracking pixels from advertising networks such as Google AdWords, Bing Ads, and Facebook in order to identify when an advertisement has successfully resulted in the desired action, such as signing up for the HubPages Service or publishing an article on the HubPages Service.
Statistics
Author Google AnalyticsThis is used to provide traffic data and reports to the authors of articles on the HubPages Service. (Privacy Policy)
ComscoreComScore is a media measurement and analytics company providing marketing data and analytics to enterprises, media and advertising agencies, and publishers. Non-consent will result in ComScore only processing obfuscated personal data. (Privacy Policy)
Amazon Tracking PixelSome articles display amazon products as part of the Amazon Affiliate program, this pixel provides traffic statistics for those products (Privacy Policy)
ClickscoThis is a data management platform studying reader behavior (Privacy Policy)